Overview
If you’ve been working through the Create Demos series in order, you already know how to:
- Create and share templates
- Set display settings
- Capture screens
- Create guides for guided demos
If those workflows feel familiar, you’re ready for the next step.
This guide covers how to publish demos, share them, and manage the settings that shape the viewer experience after a demo goes live. Whether your demo includes guides or not, the publish and share workflow is the same.
Publishing is more than generating a link. It is where you define access, viewer experience, CRM connection points, demo behavior, and how the asset will actually be used in the field.
📖 This article is part of our guide series on creating demos.
Explore the full series:
In This Guide:
This guide walks through the core workflows for previewing, publishing, sharing, and managing demos after they are created.
- Preview Demos
- How to Share Demos
- Create Demos
- The Share Tab
- The Opportunities Tab
- The Access Control Tab
- The View Settings Tab
- Get Ready to Publish & Share
- Set Demo Preferences
- Project Communications
- Link Settings
- Make Changes to Published Demos
- Update a Demo
- Create Multiple Demos from One Template
- Link Demos to Salesforce
- Specific Use Cases
Preview Demos
Before you publish and share, use Preview to review the demo the way viewers will see it.
This is the best moment to catch anything you want to adjust before the demo goes live.
How to Preview a Demo Before Publishing
- Open the template in Edit mode.
- From the header, click Preview and review the demo.
- If you want to make edits, return to the editor and update the template.
Once the experience looks right, you are ready to publish and share.
How to Share Demos
Walnut demos can be shared in a few different ways depending on how you want the experience to be used.
- Direct demo link
- Embed code for a webpage or external experience
- Playlist as part of a broader packaged experience
The rest of this guide focuses on how to publish the demo itself and configure the settings around that share workflow.
Create Demos

Before you click Create & Share Demo, it is worth thinking through how the demo should behave once it is live.
Helpful questions to ask before publishing:
- Do you want to personalize the demo with customer or organization names?
- Do you want to include a specific welcome message?
- Who should be able to access the demo?
- Do you want to connect the demo to a CRM opportunity?
- Who should be able to make changes later?
- For guided demos, which elements or moments should be emphasized?
Best practice: The strongest publish workflows start with the end use in mind. Think about audience, access, CRM tracking, personalization, and where the demo will be shared before generating the link.
How to Create and Share a Demo
- Navigate to the template and click Create & Share Demo in the header.
- A new pane opens with four tabs: Share, Opportunities, Access Control, and View Settings.
The Share Tab
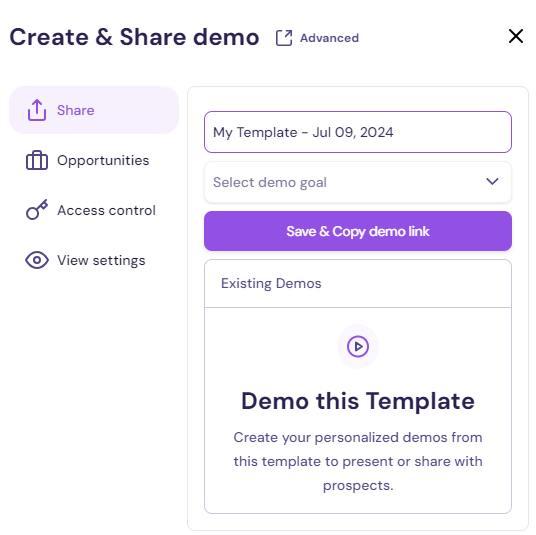
The Share tab is where you define the basic identity of the demo.
How to Use the Share Tab
- Demo name: Use the prefilled name or update it.
- Goal: Select a goal from the dropdown. If the one you want is not listed, you can add it through the Opportunities tab.
- Do not click Save & Copy Demo Link yet. Complete the remaining tabs first.
The Opportunities Tab
The Opportunities tab connects the demo to a CRM opportunity.
How to Use the Opportunities Tab
- Select an existing opportunity from the dropdown or enter a new one.
- Do not click Save & Copy Demo Link until you have completed the remaining tabs.
The Access Control Tab
The Access Control tab defines who can access the demo and how protected it should be.
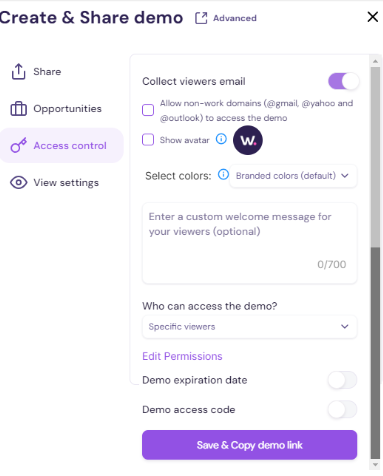
How to Use the Access Control Tab
- Show avatar: Uses the avatar from your template or company settings.
- Select colors: Choose branded or non-branded colors.
- Welcome message: Enter the text you want viewers to see.
- Who can access the demo? Choose whether the demo is available to anyone with the link, specific viewers, or no one.
-
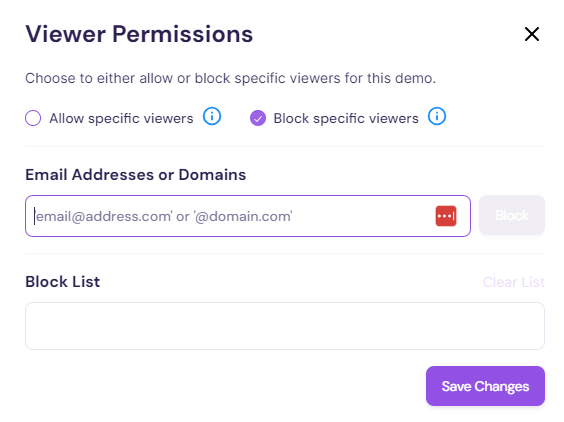
Edit permissions: Open the permissions pane to allow or block specific users. You can allow or block by individual email address or by domain.
- If a viewer is blocked and tries to open the demo, they will see the message: This demo is no longer available.
- Back in Access Control, you can also set an expiry date and a demo access code. Access codes can be customized from 6 to 255 characters.
- Do not click Save & Copy Demo Link until you have completed the View Settings tab.
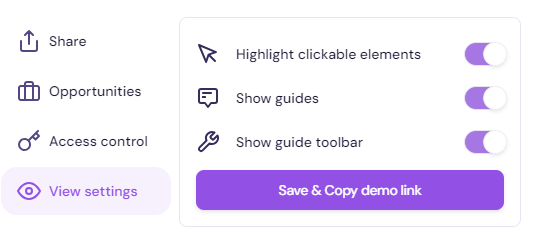
The View Settings Tab
The View Settings tab controls how the demo appears to viewers.
These settings are especially relevant for guided demos.
You can enable only the options you need and turn the rest off.
Get Ready to Publish & Share
Once you have configured all four tabs, click Save & Copy Demo Link. The demo link is copied to your clipboard and the demo is ready to share.
Tip: Before sending the link externally, open the live demo once and do a final viewer-side review. This is also a good time to apply any additional demo preferences covered in the next section.
Set Demo Preferences
Demo preferences give you additional control after a demo is published.
This includes settings such as notifications, embed code, access controls, link behavior, and other viewer-facing adjustments.
Note: If the demo has already been shared, you can still update these settings later.
How to Open Demo Preferences
- Go to your library and find the demo you want to update.
- Click the three-dot menu and select Set Demo Preferences.

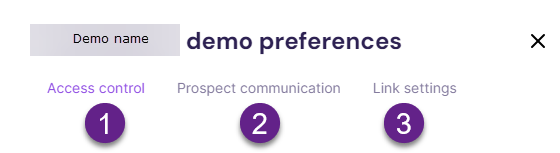
Demo Preferences includes three tabs:
- Access Control
- Project Communications
- Link Settings
Access Control
Use this section to refine who can view the demo and whether additional access restrictions apply.
How to Set Access Control Preferences
-
Open the Access Control tab.
- Control who can view the demo from the dropdown.
- Block specific viewers by email address and add them to the Block List.
- Set a demo expiration date if needed.
- Create a demo access code so only viewers with the code can open the demo.

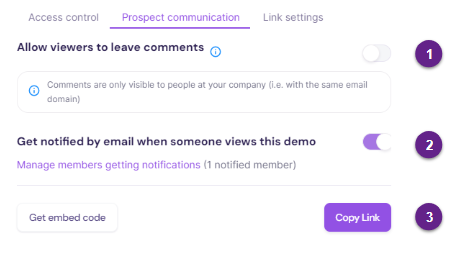
Project Communications
The Project Communications tab controls notifications and embed options.
How to Use Project Communications
- Open the Project Communications tab.
- Turn on Get notified by email when someone views this demo if you want alerts. Then click Manage members getting notifications to choose recipients.
- Enter the email addresses and click Add.
- Use Get Embed Code if you want to place the demo on a website or external page.
Note: If you want the demo to use the full browser width, enable Full Page Layout before copying the embed code.
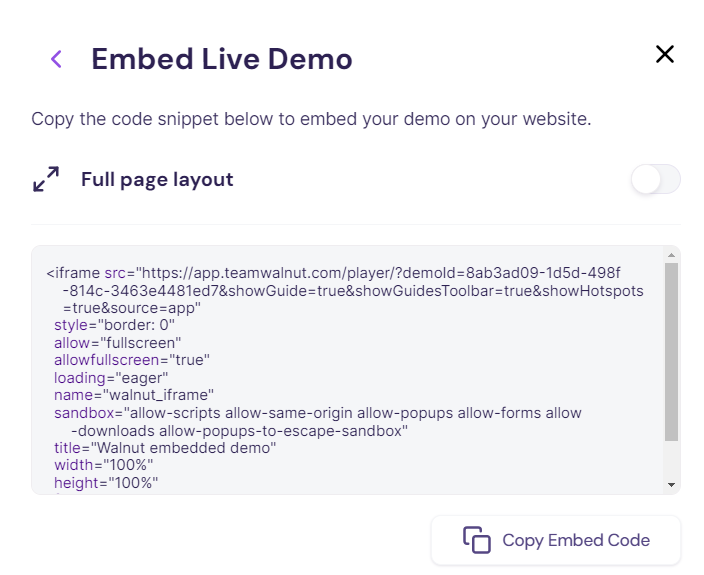
Embed notes:
- Paste the embed code into the target section of your webpage.
- The default embed uses 100% width and height of the container, but those values can be adjusted.
- By default, a Walnut watermark appears on the bottom-left side of the demo. White label custom domains remove the watermark as part of that paid add-on.
- Always preview the embedded demo to confirm spacing and layout. Learn more in Embed Demos.
Link Settings
The Link Settings tab controls how the live demo behaves through the shared link.
How to Use Link Settings
- Open the Link Settings tab. By default, the toggles are on, but you can update them as needed.
- Preview the demo and confirm the experience looks and behaves the way you want.
- When you are ready, click Copy Link.
Make Changes to Published Demos
If you need to adjust a published demo, go back to the template, make the updates, and republish or update the live demo depending on your goal.
Update a Demo
Updating a demo is useful when you want to improve or refine a live version without changing its URL or embed code.
However, updates overwrite the current live demo version, which means analytics remain grouped under the same demo. If version comparison matters, you may want to create a new demo instead.
Click here to see it in action.
Update a Demo from the Template
- Navigate to the demo template.
- Click Create & Share Demo.
- Click the three-dot menu next to the version you want to update.
- Click Update Demo. The URL remains the same.
Update a Demo Without Opening the Template
- Make sure the latest changes are already saved in the template.
- In the relevant library, hover over the demo row or click into it.
- Open the three-dot menu and select Update Demo.

Create Multiple Demos from One Template
One template can support many demo versions.
This is especially useful when you are changing variables such as company name, avatar, welcome message, or use-case framing and want to preserve the current live demo while creating a separate version.
How to Create Multiple Demos from One Template
- Open the template in Edit mode and make the changes you want.
- Preview the updated experience.
- Click Create & Share Demo.
- Rename the new demo version.
- If the share settings are correct, continue.
- Click Save & Copy Demo Link.
The next time you create a demo from that template, you will see the previously created demo versions in the same workflow.
Link Demos to Salesforce
For more on connecting demos to Salesforce, see Connect to Salesforce.
Specific Use Cases
Here are a few common scenarios and how they work.
1. Delete a Guide in a Template After You Publish a Demo
Once a demo is published, it is standalone. Deleting a guide from the template will not change the already-published demo automatically.
However, if you later run Update Demo, the live demo will pull the latest template content and the deleted guide will no longer appear.
2. “Demo Not Available” Message
If you see this message, here are the first places to check:
- Check Demo Preferences: Review the demo expiration date.
- Adjust or remove the expiry date: If needed, extend it or remove it entirely.
- Check access controls: Confirm the viewer is not blocked and the correct access settings are in place.
- Check access code settings: If an access code is enabled, make sure the correct code is being used.
Summary
Publishing and sharing is the stage where a demo moves from build mode into real use.
It is where you decide how the experience should be named, who can access it, how it should look, whether it connects to CRM workflows, and how it should behave once it is live.
With the right publish settings, demo preferences, and update strategy in place, you can turn one strong template into a scalable demo workflow that is easier to personalize, track, and manage over time.
A strong demo is not finished when the build is done. It is finished when the share experience, access settings, and live behavior are all aligned with how the demo will actually be used.