About
When you connect Salesforce to Walnut, you integrate engagement data directly into your workflow. The integration makes it super easy to:
- Enrich your sales process with these key insights so account executives can follow up with extremely precise info about their prospects’ intent.
- Access demo-related data in one place.
- Manage their deals and stay on top of opportunities.
By connecting Walnut to Salesforce, you can:
-
Access a demo by clicking on "Get a demo" on any Salesforce objects, including leads, contacts, opportunities, and accounts.
-
Search and copy a playlist link from the Salesforce flow, with the object level identifier in the URL.
-
Build custom reports using Playlist engagement data via a Playlist custom object.
In this article
- Before you start
- Step 1: Connect Walnut to SalesForce
- Step 2: Install the Walnut app in Salesforce
- Step 3: Set up access to the Walnut app
- Step 4: Configure Walnut objects in Salesforce
- Step 5: Share Walnut reports & dashboards
- Step 6: Set up Walnut Deal view in Salesforce
- Step 7: Add the ‘Get a Demo’ button
- Link demos to Salesforce
Before you start
- You are a Walnut admin and are familiar with Salesforce configurations.
- The opportunities you see are linked to the Salesforce user selected for the authentication. Opportunities for this user are also available in Walnut.
- You'll create new opportunities, contacts, or accounts in Salesforce.
- There’s a sequence to the steps, but you don't have to do them all in one fell swoop!
NOTE: Walnut uses a 3rd-party to enable the integration with Salesforce. Walnut may change and add new tools in the future. Contact support@walnut.io for more information.
Step 1: Connect Walnut to Salesforce
This step has three parts:
Salesforce setup
Depending on the integrating user license type here are two different recommendations:
Salesforce - User License
If you prefer to use a Salesforce type user license to integrate walnut here are the following recommendation you’ll need to follow in order to make sure the integration is successful
1. Create a Custom Walnut Profile
-
Clone the Contract Manager profile
-
Assign the following permissions
Access ActivitiesEdit Tasks
Customize ApplicationModify Metadata Through Metadata API FunctionsView All DataManage FlowRun Flows
- Create a User
- Use existing or Create a User with:
- User License
Salesforce - Profile
Walnut Profile
- User License
- Use existing or Create a User with:
Salesforce Integration - User License
Following the **Best Practices for Configuring Your Integration User** guide, start by establishing a new user for the walnut integration.
-
Create a new user
- User license -
Salesforce Integration - Profile -
Salesforce API Only System Integrations
- User license -
-
Create a new dedicated permission set
-
Label -
Walnut Integration Permission Set -
License -
Salesforce API Integration
-
-
Assign the following permissions:
- Under
System PermissionsAccess ActivitiesEdit TasksCustomize ApplicationModify Metadata Through Metadata API FunctionsView All Data
- Under
App Permissions- Under
Flow and Flow OrchestrationManage FlowRun Flows
- Under
- Under
-
Assign
Walnut Integration Permission Setto newly createdWalnut Integrationuser-
Manage assignments
-
Add assignment
-
Select the
Walnut Integrationuser and click Next -
Click Assign
-
Functionality - Retrieves core Salesforce object records accessible to the integration user.
OpportunitiesAccountsContactsLeadsTasksEvent
Initial export details
- Method: Utilizes RESTful API calls to Salesforce, authenticating via OAuth 2.0
- Endpoint Details: Walnut primarily uses the SOQL query endpoint
/services/data/vXX.0/query?q= - API Rate Limiting: Adherence to Salesforce's limit of 2,000 entities per API call
Ongoing export details
- Operation: Continuously updates new or changed records, using Salesforce Flow.
- Workflows (specifically Outbound Messages) are not supported for Starter Suite and Professional license. Therefor AutoSync will not work for companies that have that kind of license.
- If you've followed the required permissions mentioned above, then a Salesforce flow that handles automatic synchronization will be created.
- Disabling the Salesforce Flow or removing the remote site can immediately halt the real-time data synchronization between Salesforce and Walnut.
- This disruption means that updates in Salesforce (like changes in opportunity status) will not be reflected in Walnut, leading to outdated or incomplete data being used in sales processes.
Connect Walnut in Salesforce
When you connect Walnut to Salesforce, the process sets a secure OAuth 2.0 Authentication before the initiation of data exchanges. This ensures that all data transfers are secure and authorized.
Here's the workflow.
To connect Walnut to Salesforce:
- Navigate to Integrations>Salesforce and click Connect. A new screen opens.
- At this screen, name the authentication and select the Salesforce instance type from the dropdown.
- Click Create. A new screen opens.
- Select the Salesforce account.
- Click Finish. You’ll see a success message in the top right of the screen and the connection toggle is set to ON.
That's step 1 completed. The next step is to install the Walnut app in Salesforce.
Step 2: Install the Walnut app in Salesforce
Walnut for Salesforce is a managed package app that pushes your Walnut demos data into your Salesforce account. With the package installed, any tracked demo session will be pushed to the relevant Salesforce accounts, opportunities and contacts as a custom object.
The package includes the ability to configure demo data in these Salesforce objects.
- Opportunity
- Account
- Contact
- Pre-defined reports
- Predefined dashboard
Here's the workflow.
To install the Walnut app in Salesforce:
- Locate the Walnut App in Salesforce's AppExchange Market. Then click Get It Now.
- Login to your Salesforce account and decide if you want to install in the production or sandbox environment. A new screen opens.
- Verify the installation details, then click Confirm and Install. A new screen opens.
- Select Install for All Users. A new screen opens.
- Accept Third-Party access and click Continue. A new screen opens.
- Click Done.
NOTE: If you see a warning message ‘This app is taking a long time to install”, hold tight. You’ll receive a notification when the installation completes.

Great. The Walnut app package is installed in Salesforce. The next step is to set up access for all users in your Go To Market Team.
NOTE: Another way to install the Walnut app is to log into Salesforce, from the header select Setup. Use Quick Find to find the AppExchange Marketplace and then install from there.
Onto step 3!
Step 3: Set up access to the Walnut app
We recommend you grant all users in your Go To Market Team access to the demo data found in Walnut as all users.
Here are the workflows.
To set up access to the Walnut app for all users:
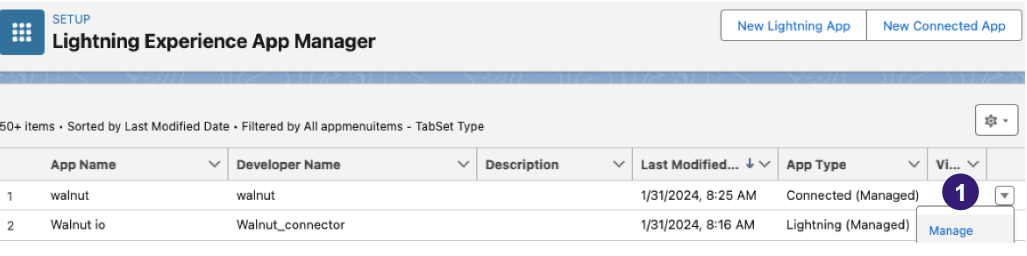
- Navigate to Setup > App Manager.
- Find the Walnut app, click the right arrow and select Manage. A new screen opens.
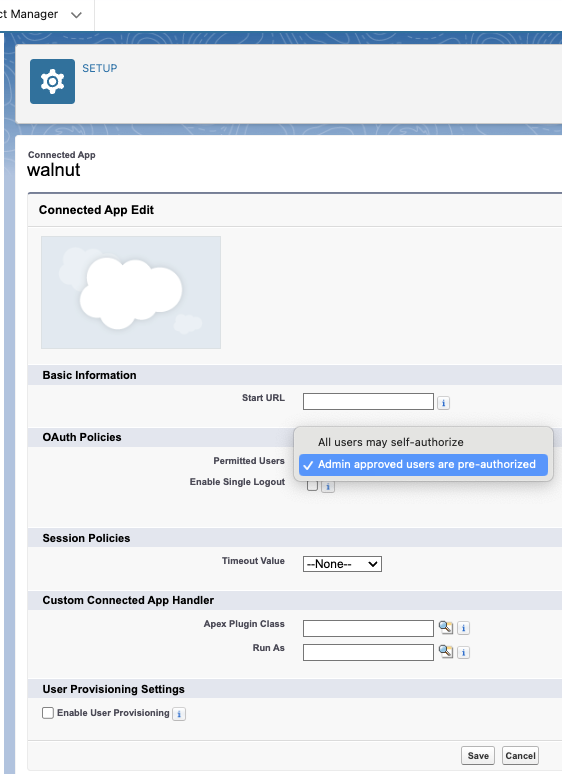
- To set OAUth, navigate to Edit Policies. A new screen opens.
- You only need to set OAuth policies. Set Permitted Users to Admin approved users are pre-authorized.
- Verify the settings, then click Save.
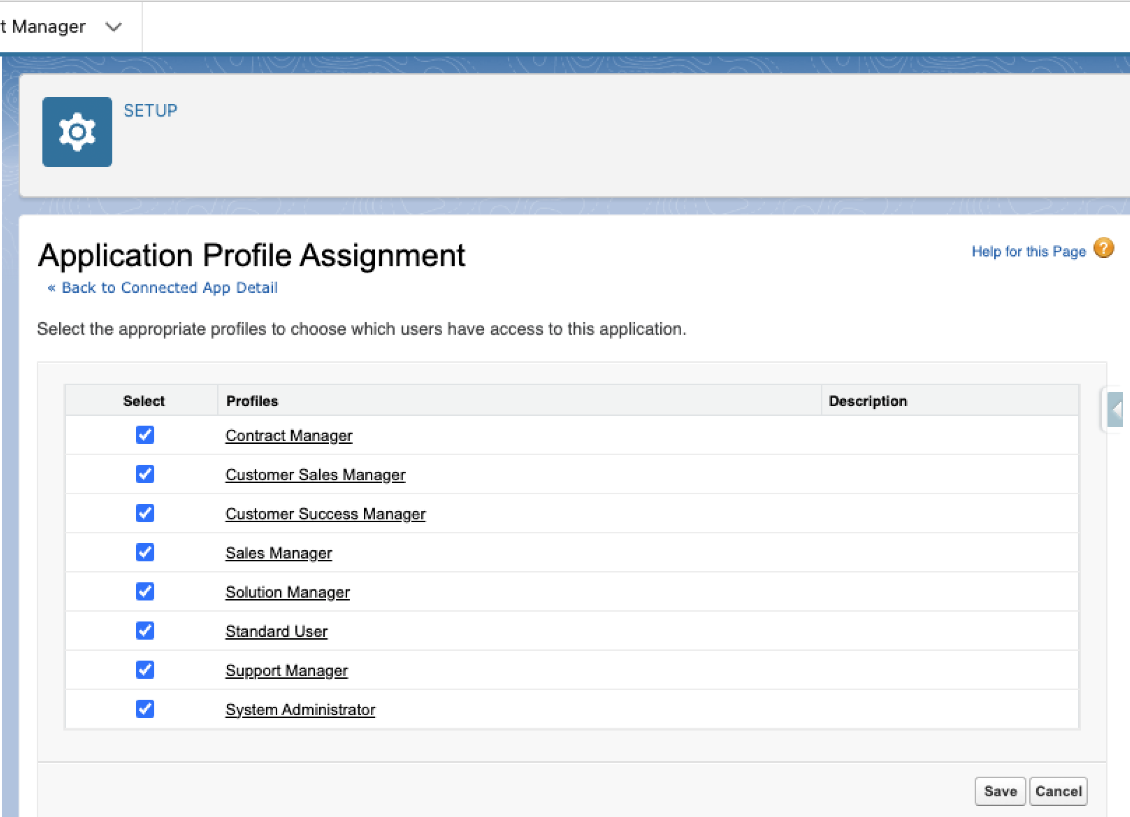
- Next click the Edit Profiles button at the bottom of the page. A new screen opens.
- Assign the policies to all relevant profiles.
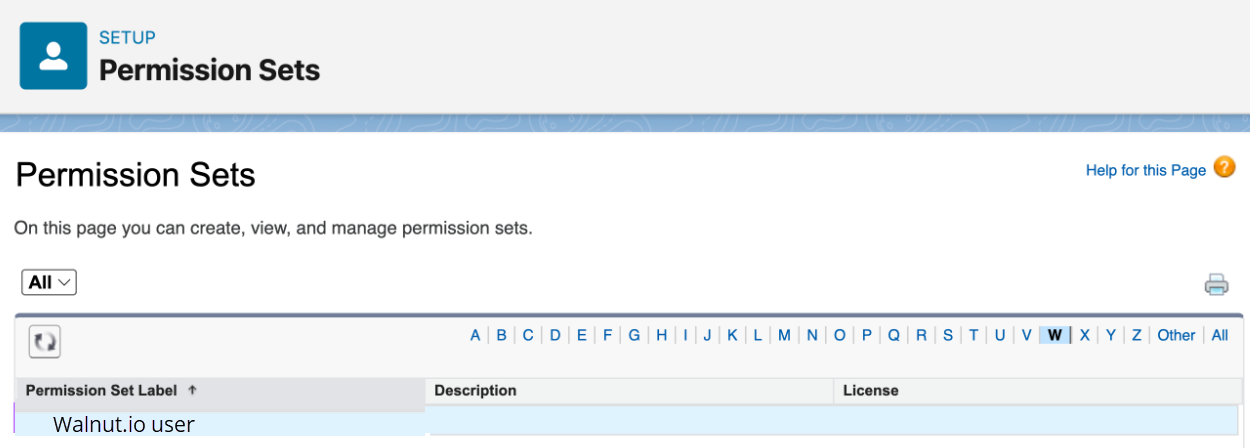
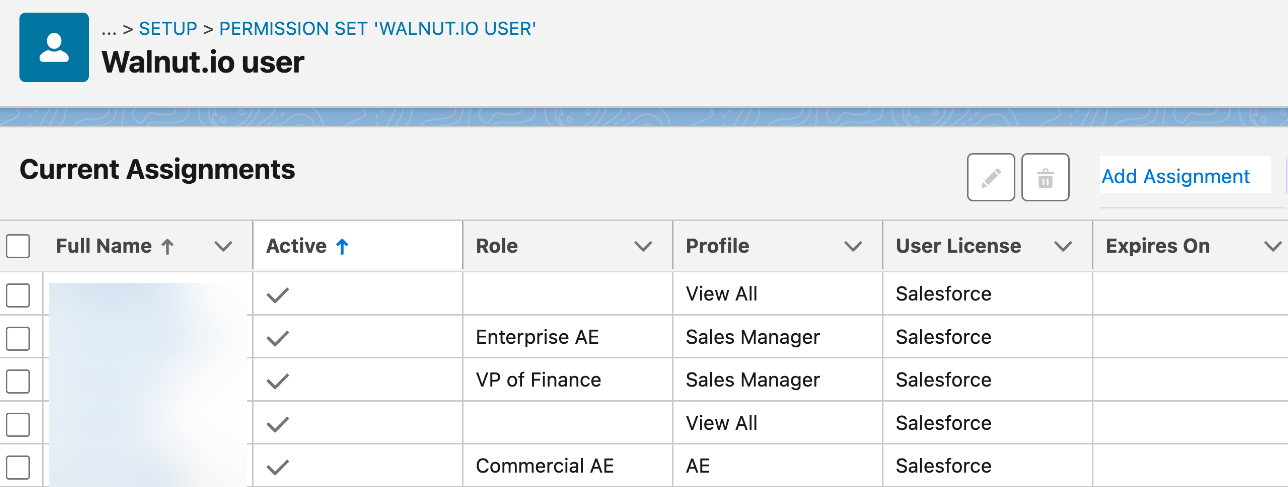
To set access to Walnut demo data:
- From the Home tab, search for Permission Sets and find Walnut.io user.
- Click Manage Assignments. A new screen opens.
- Click Add Assignment.
- Select the users you want to add and click Next. A new screen opens.
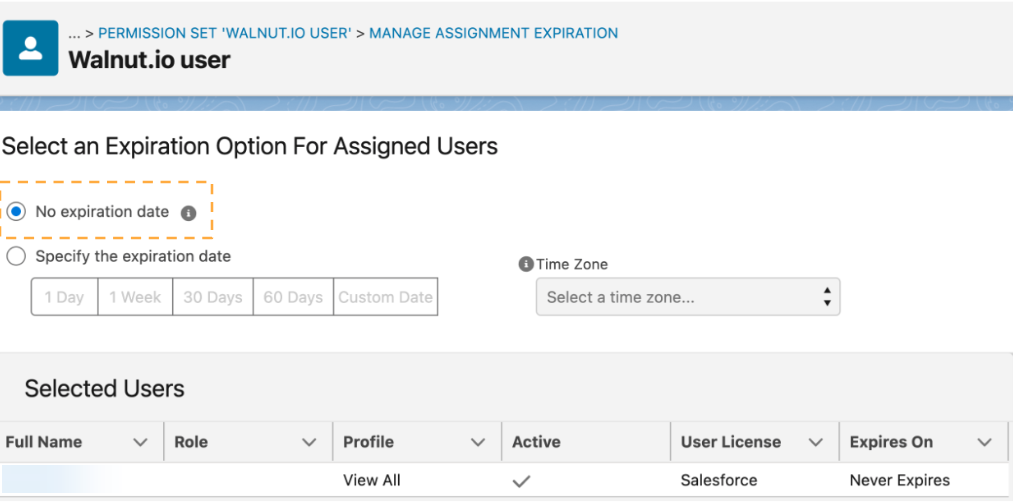
- Ensure that No expiration date is active.
- Click Assign. The Assignment summary page opens.
- Click Done to finalize the user permissions.
NOTE: If you receive an error or failure message, check to see if the user assigned still has an active account.
Another step completed! The next step is to configure Account, Contact, and Opportunity Objects.
Step 4: Configure Walnut objects in Salesforce
Walnut currently supports adding enriched demo data to these Salesforce objects.
Here are the workflows.
To configure the Account object:
- From the sticky header, select Setup then Object Manager.
- Search for the Account object. A new screen opens.
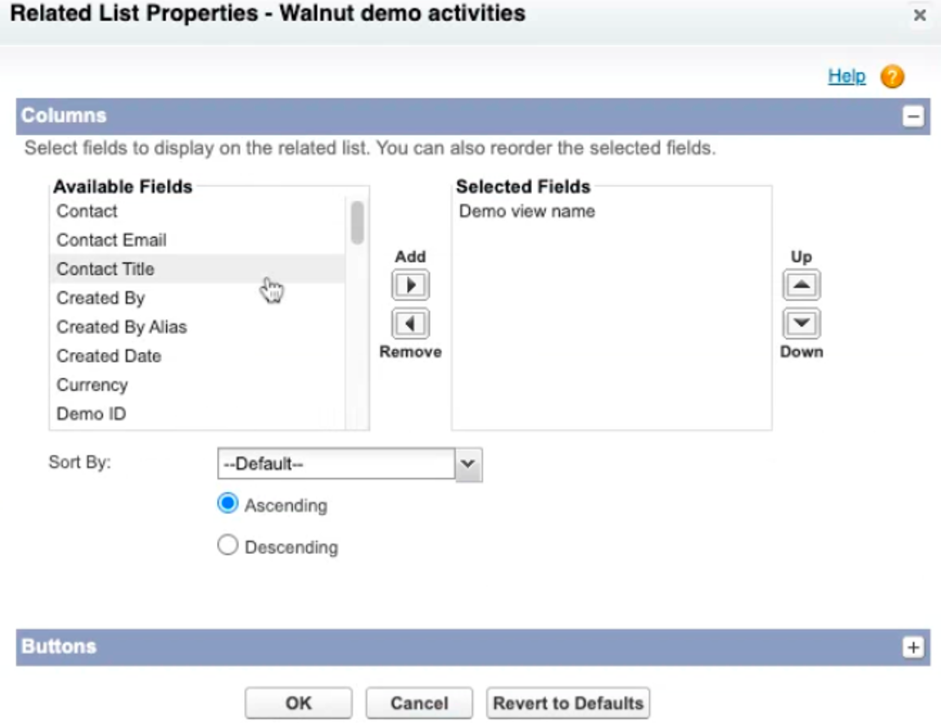
- From the left pane select Page Layouts and from the main screen select Related Lists.
- Use Quick Find to find Walnut Demo Activity and drag it into the Related Lists section.
- Next add these fields:
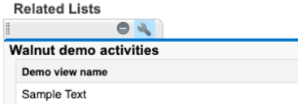
- Demo View name
- Demo Name
- Demo Link
- Demo Session Started At
- User Email (viewer of the demo)
Opportunity
- Click OK and save the Page Layout.
To configure the Opportunity object:
- From the sticky header, select Setup then Object Manager.
- Search for the Opportunity object. A new screen opens.
- From the left pane select Page Layouts and from the main screen select Related Lists.
- Use Quick Find to find Walnut Demo Activity and drag it into the Related Lists section.
- Next add these fields:
- Demo View name
- Demo Name
- Demo Link
- Demo Session Started At
- User Email (viewer of the demo)
- Opportunity
- Click OK and save the Page Layout.
To configure the Contact object:
- From the sticky header, select Setup then Object Manager.
- Search for the Contact object. A new screen opens.
- From the left pane select Page Layouts and from the main screen select Related Lists.
- Use Quick Find to find Walnut Demo Activity and drag it into the Related Lists section.
- Next add these fields:
- Demo View name
- Demo Name
- Demo Link
- Demo Session Started At
- User Email (viewer of the demo)
- Opportunity
Click OK and save the Page Layout.
Step 5: Share Walnut reports & dashboards
Efficient collaboration and transparency within your organization are vital for successful business operations. To ensure that all members of your organization have access to reports and dashboards, Walnut provides a straightforward folder sharing feature.
Here are the workflows.
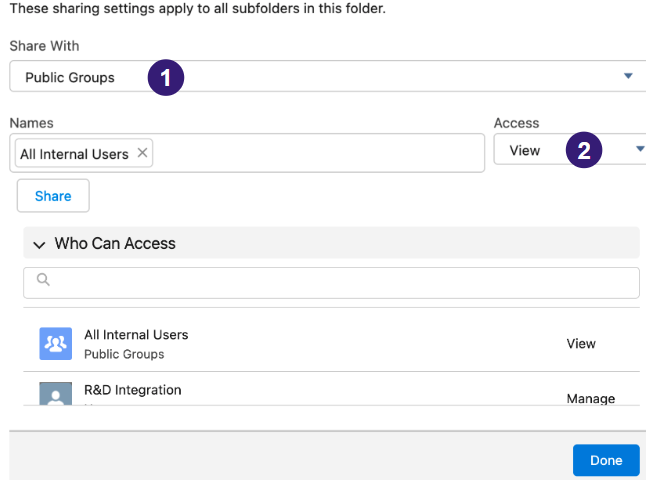
To share Walnut reports from Salesforce:
- From the 9 dots main app icon, select Reports.
- In the left hand pane select Folders and on the screen select Walnut Reports.
- Click the arrow on the right and select Share.
- Share With: Public Groups (#1).
- Access: Assign access permissions (#2).
- Click Done.

To share the Walnut dashboard from Salesforce:
- From the 9 dots main app icon, select Dashboards.
- In the left hand pane select All Folders and on the screen select Walnut Dashboards..
- Click the arrow on the right and select Share.
- Share With: Public Groups (#1).
- Access: Assign access permissions (#2).
Click Done.
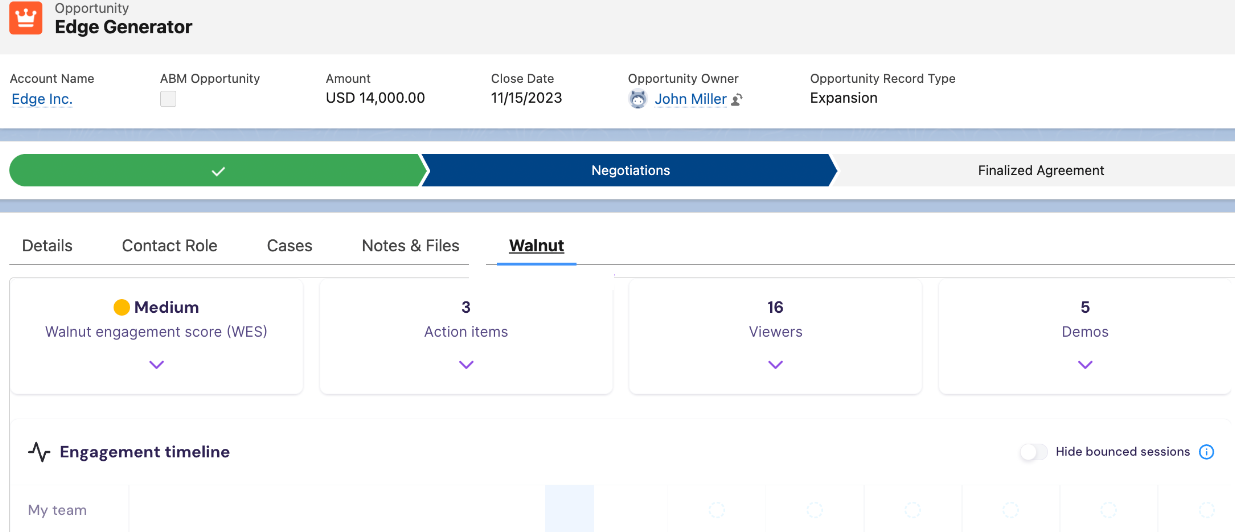
Step 6: Set up Walnut Deal view in Salesforce
This feature is essential for teams that need a detailed and interactive view of their deals in Salesforce.
- You must be enrolled as a member of our Deal Intel Beta to view the content of this tab in Salesforce. Please contact your CSM to enroll.
Here's the workflow.
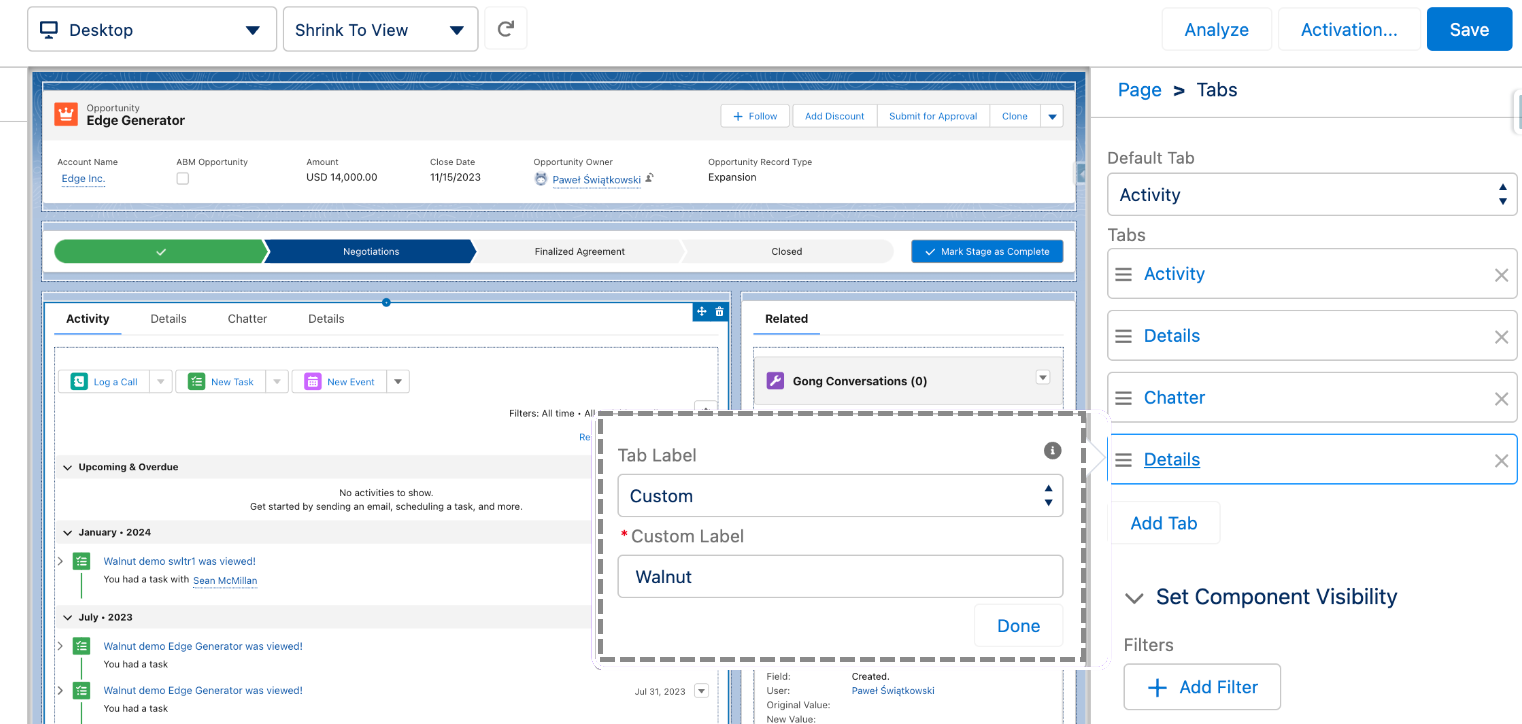
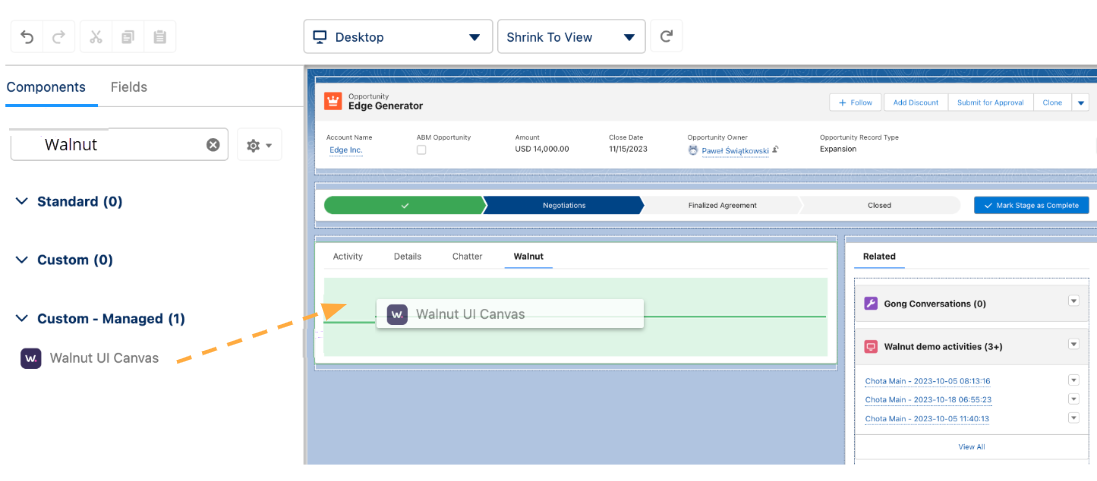
To set up the Walnut Deal view in Salesforce:
- Navigate to Sales>Opportunities and from the sticky header, click Edit page.
- A new screen opens. From the right hand pane, click Add Tab. A new screen opens.
- Name the label Walnut. Then drag Walnut UI Canvas onto the screen.
- In the right pane add these settings:
- Action: deal_view
-
Canvas Header: 848
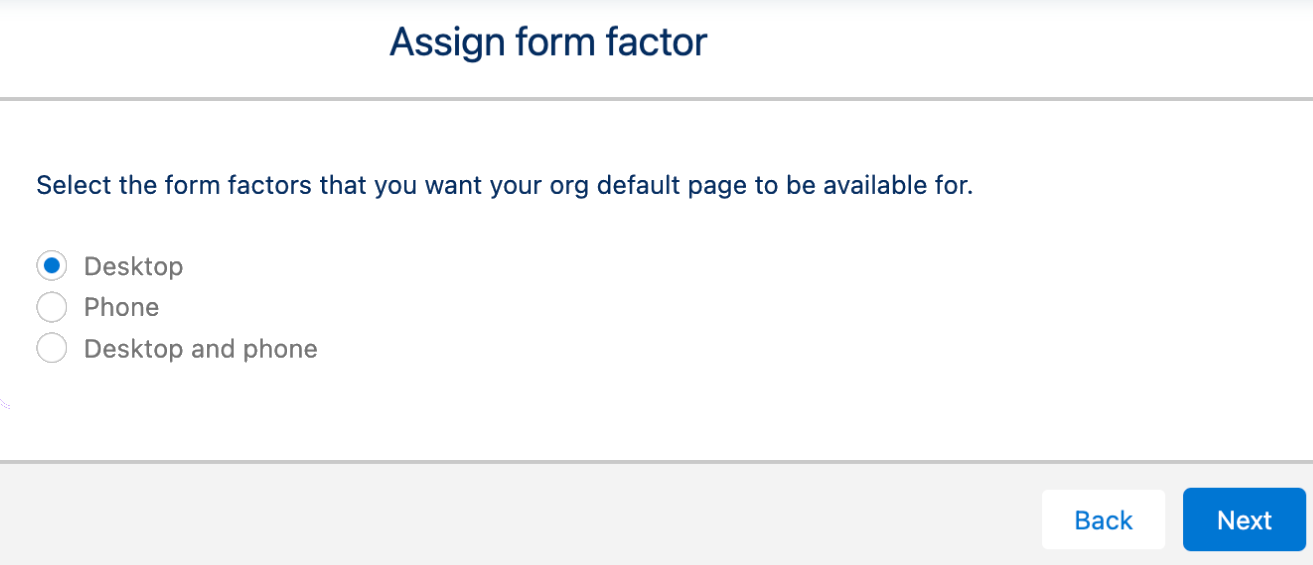
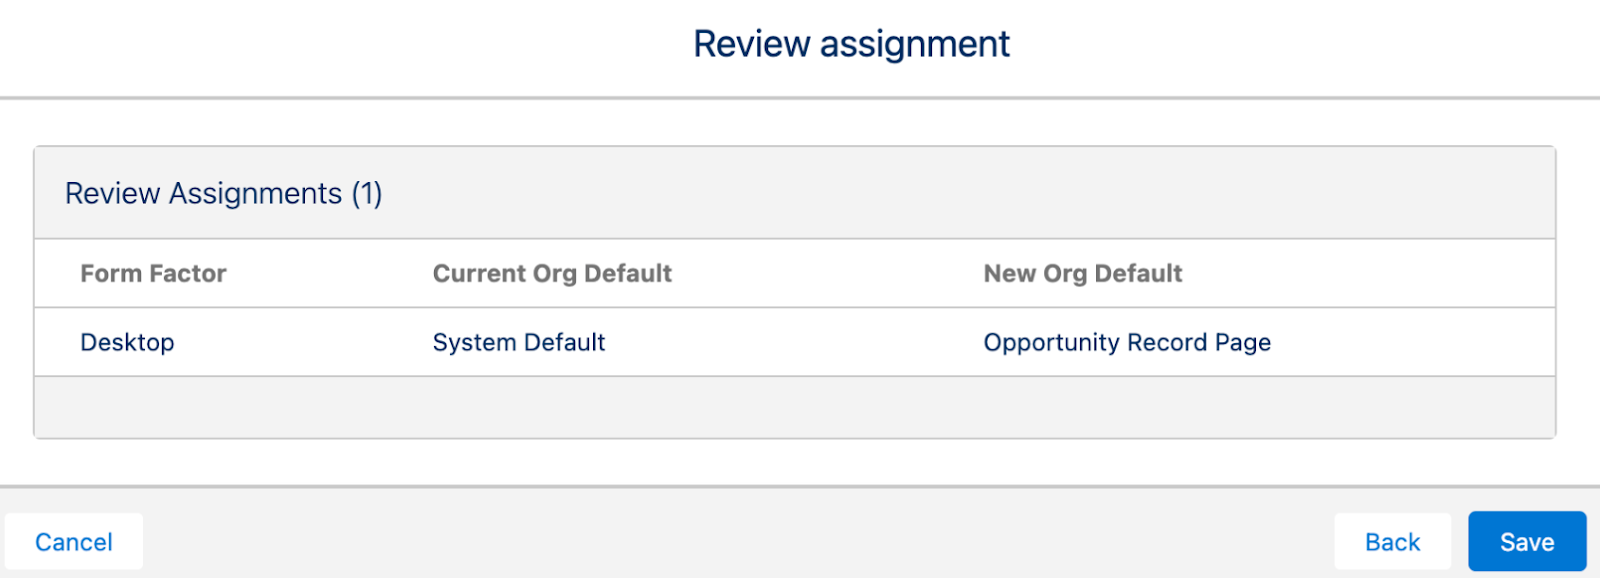
- When this completes, click Assign as Default. A new screen opens.
- Select Desktop and click Next.
- Review the assignment.
- Click Save.
- To finalize, close edit on the Opportunities page and verify that Walnut shows in Opportunities.

Now let's set up the Get Demo button.
Step 7: Add the ‘Get a Demo’ button
The final step is to add a Get a Demo button.
Here's the workflow.
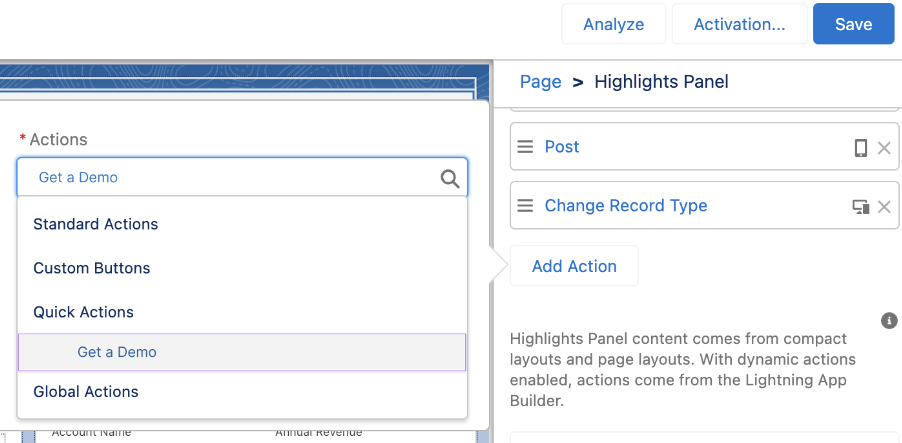
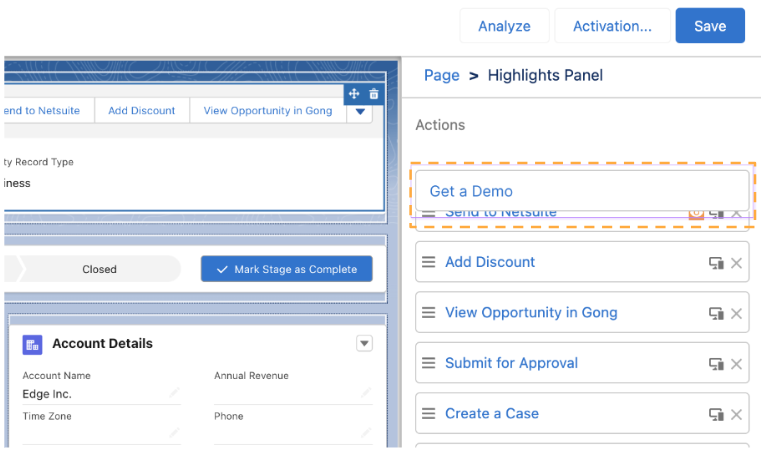
To add a ‘Get a Demo” button to a page in Salesforce:
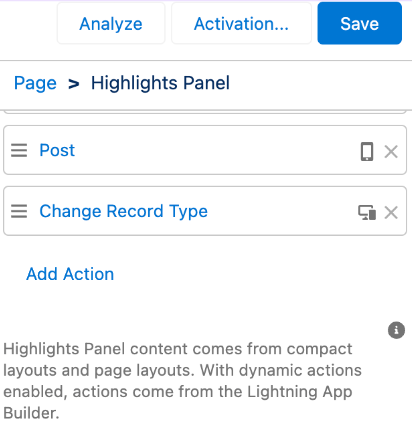
- Navigate to Opportunities and from the stick header select SetUp>Edit Page.
- Select the highlights panel and click Add Action.
- In the Actions pane, search for Get a Demo. Select it and click Save.
- Next move the Get a Demo button to the top of the action list by dragging it to the top. Then click Save.
- Exit the editor and return to the Opportunities page and verify that you see the Get a Demo button.
- Click the button to open the Walnut tab.

That's it. You've completed the 7 step setup between Walnut and Salesforce. You're all set to get demo and enrichment data to get a rich insights to enhance prospect engagement!
Walnut-Salesforce data syncs
Once the setup is complete, demo sessions connect automatically to the Salesforce objects Accounts, Contacts, and Opportunities (see section Step 4: Configure Walnut objects in Salesforce.
Walnut pushes demos views to Salesforce entities when:
- a demo session is identified or
- a demo was connected to an opportunity upon creation.
Manual connections to opportunities
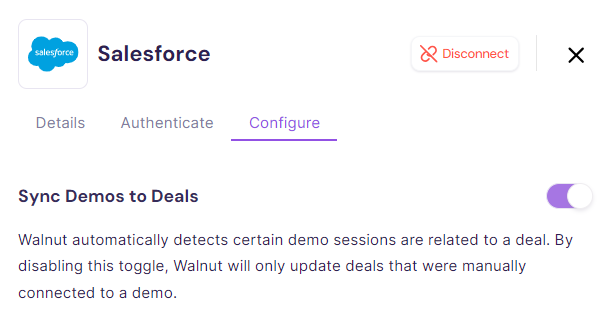
When an email is collected, Walnut always pushes the demo session to that opportunity. To disable this in Walnut, navigate to Integrations, and disable the Demo-to-Deal sync.
Walnut algorithm checks
| Algorithm | Result |
| Email match - single opportunity | Pushes data to the contact and opportunity objects. |
| Email match - multiple opportunities | Pushes data to the account and contact objects |
| Email match - no opportunity | Searches for other matches in the account. |
| Email mismatch - similar email found | Pushes data to the account object. |
| Email mismatch - no similar email | Pushes data to the lead entity. |
| No email collected - manual connection | Pushes data to the opportunity object. |
IMPORTANT: Walnut does not match or attempt to associate sessions with non-work email domains and other conditions. For example, if a demo viewer uses an email address such as 'name@gmail.com,' our algorithm does not match these sessions to Salesforce opportunities.
These include:
- Non-work email addresses
- Internal email addresses
- Bounced sessions
Activity Task Field Mapping
Whenever a demo or playlist session is viewed by a tracked user, Walnut automatically creates a Salesforce Task (also known as an Activity) associated with the relevant Salesforce records.
Walnut sets several key fields and links each task to the appropriate CRM entity:
Common Fields
| Field | Value |
|---|---|
| Subject | Demo: [Walnut] Demo {demo.name} was viewed!Playlist: [Walnut] Playlist {session.playlist_name} was viewed!
|
| Description | Demo: Viewed by {email} \n For more insights visit https://app.teamwalnut.com/insights/{demo.id}Playlist: Viewed by {email} \n For more insights visit {session.session_url}
|
| Status | Completed |
Entity Linking Logic
| Entity Type | Salesforce Field | Logic |
|---|---|---|
| Contact / Lead | WhoId |
Assigned if a Contact ID or Lead ID is provided |
| Opportunity | WhatId |
Takes precedence if present |
| Account | WhatId |
Used only if Opportunity is not linked |
⚠️ Note: If both Opportunity and Account IDs are provided, the WhatId will use the Opportunity ID, and the Account ID will be ignored.