Create a live overlay
Create a Walnut Live overlay from the Library New Asset menu or the Chrome extension's Live tab, and start editing your live product on the page you demo on.
Create a live overlay
Overview
A live overlay holds every change you make to your live product for a site. You can start one from the Walnut Library or straight from the Chrome extension. Either way, it opens on the page you demo on, ready to edit.
Who can do this: account owners, company admins and editors, with Walnut Live on a trial or bought. Presenters and viewers can't create overlays.
Option 1: From the Library
-
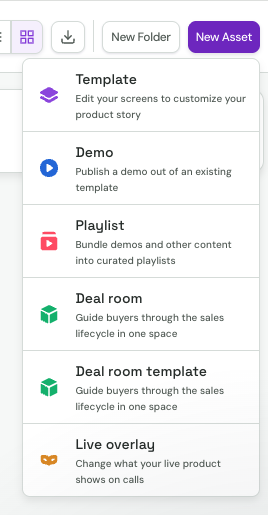
In Walnut, open the Library and click New Asset.
-
Choose Live overlay ("Change what your live product shows on calls"). The Create live overlay window opens.
-
Under Which page do you demo on?, enter the full address of the page, for example
https://app.yourproduct.com/dashboard.- Suggested sites lists sites you recently switched an overlay on, sites your team already has overlays on, and sites your company has captured. Click one to fill in the field, then edit it if you want a deeper page.
- You can type just the domain (
app.yourproduct.com); Walnut addshttps://for you.
-
Click Continue.
The page opens in a new tab. The extension's Live panel opens beside it with a new overlay named after the site (for example, "app.yourproduct.com overlay"), already switched on, so you can start editing right away.
If the window asks for something first
- No Walnut Live access: the Walnut Live window opens instead. Owners and admins can start a free trial or buy; editors can ask an admin. See Walnut Live trial and purchase.
- Extension not installed: the window says Live overlays are built with the Walnut Chrome extension and shows Add to Chrome. Keep the window open after you install; it moves on by itself once the extension is ready.
Option 2: From the Chrome extension
- Open the page you demo on in Chrome.
- Open the Walnut extension and click the Live icon in the mode switcher. Live opens in Chrome's side panel, so it stays beside the page while you work.
- In the Live tab:
- If the site has no overlay yet, click Create overlay for this site.
- Otherwise, click New overlay.
- Fill in the form:
- Name: for example, "Acme Bank".
- Sites: one per line. You can use
*as a wildcard, for example*.example.com/reports/*.
- Click Create and start editing.
The Live tab at a glance
When you open Live, its home lists your overlays:
- On this site: overlays for the site in the current tab. Click one to switch it on.
- Other sites: overlays for other sites. Click one to open its site in this tab.
Each row shows whether the overlay is Mine or Company and how many edits it has. Hover a row for the Edit (pencil) and Present buttons. Its menu has Switch off, Open in tab, Open in tab and edit, Rename, Duplicate, Share with company and Delete.
Only one overlay applies to a site at a time. Switching on another overlay replaces the first one.
Next steps
FAQ
Why don't I see "Live overlay" in the New Asset menu?
It shows only to account owners, company admins and editors, and only when Walnut Live is available for your company.
Can one overlay cover several sites?
Yes. Add each site on its own line under Sites, either when you create the overlay or later in Overlay settings.