Publish & share demos
Publish & share demos
Overview
If you’ve been working through the Create Demos series in order, you already know how to:
Create and share templates
Set display settings
Capture screens
Create guides for guided demos
If those workflows feel familiar, you’re ready for the next step.
This guide covers how to publish demos, share them, and manage the settings that shape the viewer experience after a demo goes live. Whether your demo includes guides or not, the publish and share workflow is the same.
Why this matters:
Publishing is more than generating a link. It is where you define access, viewer experience, CRM connection points, demo behavior, and how the asset will actually be used in the field.
Preview Demos
Before you publish and share, use Preview to review the demo the way viewers will see it.
This is the best moment to catch anything you want to adjust before the demo goes live.

How to Preview a Demo Before Publishing
Open the template in Edit mode.
From the header, click Preview and review the demo.
If you want to make edits, return to the editor and update the template.
Once the experience looks right, you are ready to publish and share.
How to Share Demos
Walnut demos can be shared in a few different ways depending on how you want the experience to be used.
Direct demo linkEmbed code for a webpage or external experiencePlaylist as part of a broader packaged experience
The rest of this guide focuses on how to publish the demo itself and configure the settings around that share workflow.
Create Demos

Before you click Create & Share Demo, it is worth thinking through how the demo should behave once it is live.
Helpful questions to ask before publishing:
Do you want to personalize the demo with customer or organization names?Do you want to include a specific welcome message?Who should be able to access the demo?Do you want to connect the demo to a CRM opportunity?Who should be able to make changes later?For guided demos, which elements or moments should be emphasized?
Best practice: The strongest publish workflows start with the end use in mind. Think about audience, access, CRM tracking, personalization, and where the demo will be shared before generating the link.
How to Create and Share a Demo
Navigate to the template and click Create & Share Demo in the header.A new pane opens with four tabs: Share, Opportunities, Access Control, and View Settings.
The Share Tab
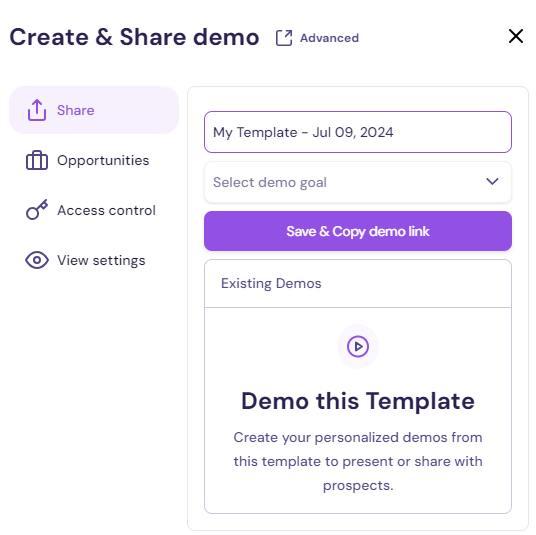
The Share tab is where you define the basic identity of the demo.
How to Use the Share Tab
Demo name: Use the prefilled name or update it.Goal: Select a goal from the dropdown. If the one you want is not listed, you can add it through the Opportunities tab.Do not click Save & Copy Demo Link yet. Complete the remaining tabs first.
The Opportunities Tab
The Opportunities tab connects the demo to a CRM opportunity.
How to Use the Opportunities Tab
Select an existing opportunity from the dropdown or enter a new one.
Do not click Save & Copy Demo Link until you have completed the remaining tabs.
The Access Control Tab
The Access Control tab defines who can access the demo and how protected it should be.
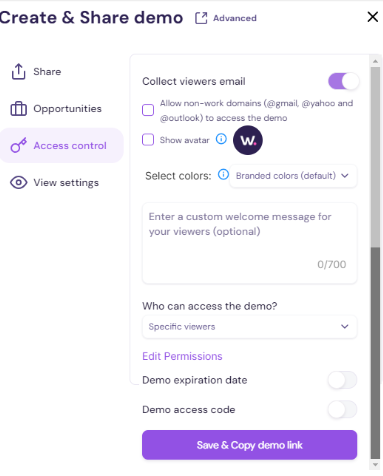
How to Use the Access Control Tab
Show avatar: Uses the avatar from your template or company settings.Select colors: Choose branded or non-branded colors.Welcome message: Enter the text you want viewers to see.Who can access the demo? Choose whether the demo is available to anyone with the link, specific viewers, or no one.Edit permissions: Open the permissions pane to allow or block specific users. You can allow or block by individual email address or by domain.
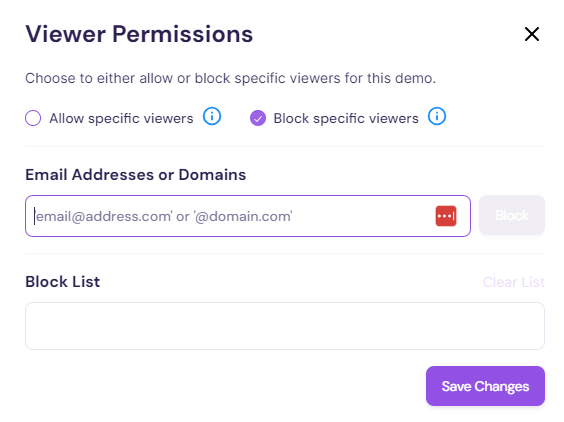
If a viewer is blocked and tries to open the demo, they will see the message: This demo is no longer available.
Back in Access Control, you can also set an expiry date and a demo access code. Access codes can be customized from 6 to 255 characters.
Do not click Save & Copy Demo Link until you have completed the View Settings tab.
Email Verification
When you collect viewers' emails, you can also require viewers to verify that address before the demo opens — so the emails in your analytics are real mailboxes, not typos or throwaways.
Turn it on for a single demo
- Open Share on the demo (or playlist).
- Turn on Collect viewers email.
- Check Email Verification.
The checkbox only appears while Collect viewers email is on — verification has nothing to verify without it. If the demo has an embedded lead form, email collection (and therefore verification) is unavailable until you remove the form.
Set the default for your whole account
Settings → Access Control → Email verification has three options:
| Option | What it does |
|---|---|
| On | New demos and playlists start with verification on. Creators can turn it off on their own assets. |
| Required | New demos and playlists require verification and creators can't turn it off. Existing demos and playlists keep their current setting. |
| Off | New demos and playlists won't ask viewers to verify. |
With Required, the Email Verification checkbox in the Share modal appears checked and locked, and Collect viewers email is locked on with it. Access Control needs Collect Viewers Email on before you can set this.
What the viewer sees
- The viewer enters their email in the welcome message (email gate).
- They get a Check your email screen, and an email with
- Clicking the link opens the demo.
Good to know:
- The link expires 15 minutes after it's sent.
- Viewers can send themselves a new link after *60 seconds replaces the previous one.
- A verified viewer stays verified in that browser for **30 viewers aren't asked again.
- Use a different email on the waiting screen lets the v
Bulk-Add to Allow and Block Lists
Gating a demo to a long list of approved buyers — or blocking an entire competitor list — does not require typing one email at a time. You can add a whole list in a single action.
Paste or Upload a Whole List
Open the permissions pane from the Access Control tab.
Paste in your emails and domains, separated by commas, spaces, or new lines — mixed separators are fine.
Or upload a CSV containing the list.
Everything is added at once, and a toast confirms how many entries landed.
The List Cleans Up as You Go
You do not have to pre-clean your input. Walnut handles the messy parts and tells you what it did:
Duplicates are skipped — the same address twice in your paste is added once.
Entries already on the list are skipped — re-uploading an updated list will not create duplicates.
Invalid rows are flagged rather than silently dropped, so you can see exactly what did not make it and fix it.
Pro tip: Because already-listed entries are skipped rather than rejected, keeping one master CSV per list and re-uploading it whenever it changes is a safe, repeatable workflow.
Find Entries in a Long List
Once a list grows, the permissions pane is searchable and filterable, so you can confirm whether a specific address or domain is on it without scrolling.
Set the Company-Wide Default (Admins)
Admins can apply an uploaded list in one of two ways:
To a single demo — the list applies only to the demo you are configuring.
Merged into the company-wide default — the list becomes part of the default applied across the company's demos.
Merging is additive: existing entries are never overwritten. This makes the company default safe to extend over time — for example, adding newly identified competitor domains to the block list without disturbing what is already there.
🔑 Learn more about Roles & Permissions.
The View Settings Tab
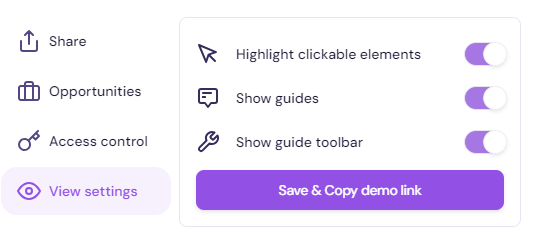
The View Settings tab controls how the demo appears to viewers.
These settings are especially relevant for guided demos.
You can enable only the options you need and turn the rest off.
Get Ready to Publish & Share
Once you have configured all four tabs, click Save & Copy Demo Link. The demo link is copied to your clipboard and the demo is ready to share.
Tip: Before sending the link externally, open the live demo once and do a final viewer-side review. This is also a good time to apply any additional demo preferences covered in the next section.
Set Demo Preferences
Demo preferences give you additional control after a demo is published.
This includes settings such as notifications, embed code, access controls, link behavior, and other viewer-facing adjustments.
Note: If the demo has already been shared, you can still update these settings later.
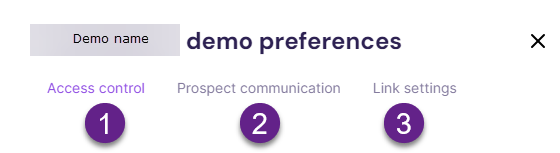
How to Open Demo Preferences
Go to your library and find the demo you want to update.
Click the three-dot menu and select Set Demo Preferences.

Demo Preferences includes three tabs:
Access ControlProject CommunicationsLink Settings
Access Control
Use this section to refine who can view the demo and whether additional access restrictions apply.
How to Set Access Control Preferences
Open the Access Control tab.
Control who can view the demo from the dropdown.
Block specific viewers by email address and add them to the Block List. To add many at once, paste or upload the list — see Bulk-Add to Allow and Block Lists.
Set a demo expiration date if needed.
Create a demo access code so only viewers with the code can open the demo.

Project Communications
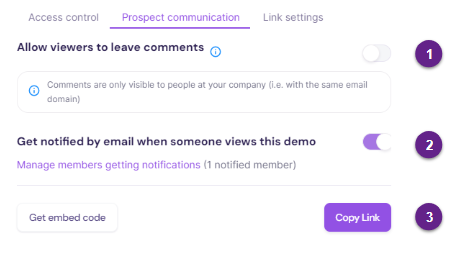
The Project Communications tab controls notifications and embed options.
How to Use Project Communications
Open the Project Communications tab.
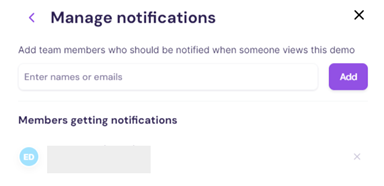 Enter the email addresses and click Add.
Use Get Embed Code if you want to place the demo on a website or external page.
Note: If you want the demo to use the full browser width, enable Full Page Layout before copying the embed code.
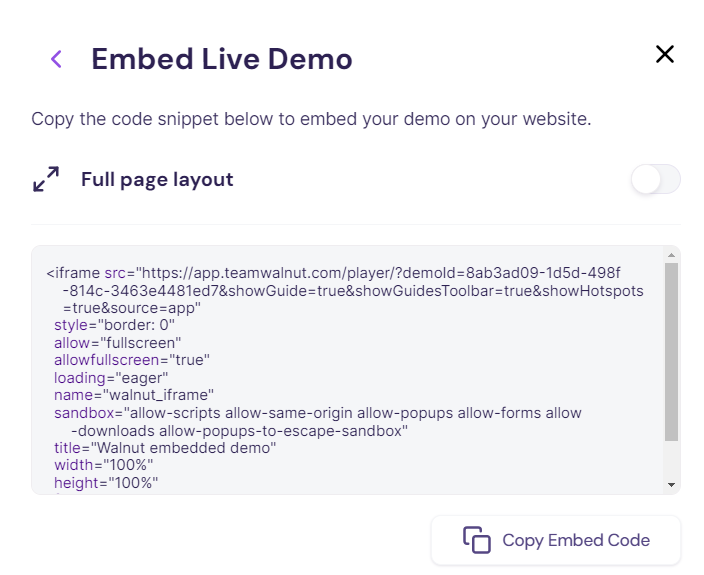
Embed notes:
Paste the embed code into the target section of your webpage.
The default embed uses 100% width and height of the container, but those values can be adjusted.
The embed snippet captures the link settings shown at the moment you copy it, so copy it again whenever you change them. A shared link, by contrast, reflects the current saved settings each time it opens.
By default, a Walnut watermark appears on the bottom-left side of the demo. White label custom domains remove the watermark as part of that paid add-on.
Always preview the embedded demo to confirm spacing and layout. Learn more in Embed Demos.
Link Settings
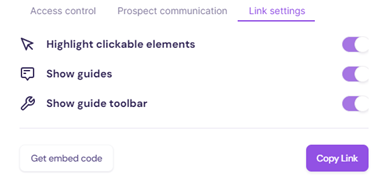
The Link Settings tab controls how the live demo behaves through the shared link.
How to Use Link Settings
Open the Link Settings tab. By default, the toggles are on, but you can update them as needed.
Playback Overrides
The Playback row lets a single share link override how the demo plays for viewers of that link, without changing the demo's own settings. Click Configure on the Playback row to open the panel and set any of the following:
- Autoplay — start playback automatically
- Loop — return to the first screen after the last one
- Narration — play the guides' audio
- Delay between steps — how long, in milliseconds, autoplay waits on each step (up to 3,600,000)
Each toggle has three states: Demo default (inherit whatever the demo itself is set to), On, and Off. The delay field is empty by default and shows the demo's own delay behind it as a hint — clearing the field goes back to the demo default.
The row's subtitle names the overrides this link carries (for example, Autoplay on · Narration off · Delay 1500ms) so a configured link still reads as configured with the panel closed. A link on the demo's own settings reads as Demo defaults.
A link that starts autoplay on a demo that wasn't authored to autoplay also gets a pause control so viewers can stop playback. A link that turns narration off reveals the audio player, even if the demo hides it, so viewers keep control over the voiceover.
If the demo was published before per-link playback overrides existed, the Configure button on the Playback row is disabled with the tooltip Update this demo to use this setting. It was published before the setting existed. Run Update Demo on the live demo to bring it onto a player build that reads these overrides, then reopen the Share panel to configure them.
Preview the demo and confirm the experience looks and behaves the way you want.
When you are ready, click Copy Link.
Make Changes to Published Demos
If you need to adjust a published demo, go back to the template, make the updates, and republish or update the live demo depending on your goal.
Update a Demo
Updating a demo is useful when you want to improve or refine a live version without changing its URL or embed code.
However, updates overwrite the current live demo version, which means analytics remain grouped under the same demo. If version comparison matters, you may want to create a new demo instead.
See it in action:
Update a Demo from the Template
Navigate to the demo template.
Click Create & Share Demo.
Click the three-dot menu next to the version you want to update.
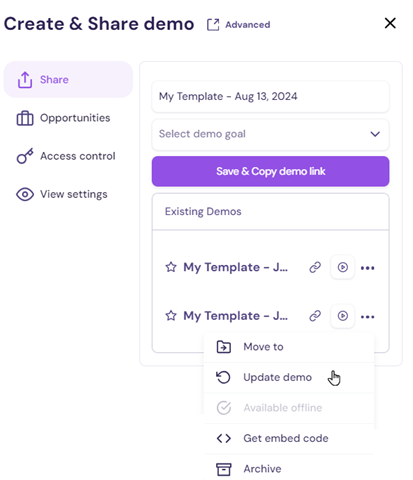 Click Update Demo. The URL remains the same.
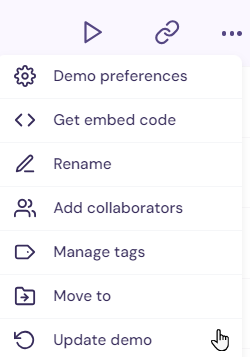
Update a Demo Without Opening the Template
Make sure the latest changes are already saved in the template.
In the relevant library, hover over the demo row or click into it.
Open the three-dot menu and select Update Demo.
Create Multiple Demos from One Template
One template can support many demo versions.
This is especially useful when you are changing variables such as company name, avatar, welcome message, or use-case framing and want to preserve the current live demo while creating a separate version.
How to Create Multiple Demos from One Template
Open the template in Edit mode and make the changes you want.
Preview the updated experience.
Click Create & Share Demo.
Rename the new demo version.
If the share settings are correct, continue.
Click Save & Copy Demo Link.
The next time you create a demo from that template, you will see the previously created demo versions in the same workflow.
Link Demos to Salesforce
For more on connecting demos to Salesforce, see Connect to Salesforce.
Specific Use Cases
Here are a few common scenarios and how they work.
1. Delete a Guide in a Template After You Publish a Demo
Once a demo is published, it is standalone. Deleting a guide from the template will not change the already-published demo automatically.
However, if you later run Update Demo, the live demo will pull the latest template content and the deleted guide will no longer appear.
2. “Demo Not Available” Message
If you see this message, here are the first places to check:
Check Demo Preferences: Review the demo expiration date.Adjust or remove the expiry date: If needed, extend it or remove it entirely.Check access controls: Confirm the viewer is not blocked and the correct access settings are in place.Check access code settings: If an access code is enabled, make sure the correct code is being used.
Summary
Publishing and sharing is the stage where a demo moves from build mode into real use.
It is where you decide how the experience should be named, who can access it, how it should look, whether it connects to CRM workflows, and how it should behave once it is live.
With the right publish settings, demo preferences, and update strategy in place, you can turn one strong template into a scalable demo workflow that is easier to personalize, track, and manage over time.
Final Takeaway:
A strong demo is not finished when the build is done. It is finished when the share experience, access settings, and live behavior are all aligned with how the demo will actually be used.